What is Lua-RTOS?
Lua language-based real-time operating system called Lua-RTOS. Lua RTOS is a real-time operating system designed for embedded systems, and it provides support for Lua scripting language. The main feature of this design is running with minimal requirements like Flash and Random-Access Memory. It’s a core of Whitecat Ecosystem, also can easily ported with any other 32-bit platform. Lua-RTOS has three different layers design and bottom layer is Hardware abstraction it only communicate with platform hardware. when you need to port any other 32-bit platform you need to write a bottom layer only and top and middle layers are same for all platforms. Now available for ESP8266, ESP32 and PIC32MHZ.
Lua-RTOS Three layers Design

- Top Layer – Lua 5.3.4 interpreter
- Middle Layer – FreeRTOS
- Bottom Layer – Hardware Abstraction
Lua-RTOS Supports various ESP32 Boards
- Whitecat ESP32 N! Board
- ESP32 Core
- ESP32 Thing (Sparkfun)
Install the Lua RTOS firmware on any ESP32 board
The Whitecat IDE
The Whitecat IDE is an online programming environment for Lua-RTOS platform devices. for this, you need to sign in Google+ with this IDE. Only Chrome browser supports it. for this, you need to install the drivers of the Boards.
Two Programmings Ways
- 1) Lua Language (Directly)
--See More : https://www.aruneworld.com/embedded/espressif/esp32/lua_rtos_esp32/
thread.start(function()
    pi0.pin.setdir(pio.OUTPUT, pio.GPIO26)
    pi0.pin.setpull(pio.NOPULL, pio.GPIO26)

    while true do
        pio.pin.setval(1, pio.GPIO26)
        tmr.delayms(150)
        pio.pin.setval(0, pio.GPIO26)
        tmr.delayms(150)
    end
end)
- 2) Block-based Programming Language (Translate block into Lua)
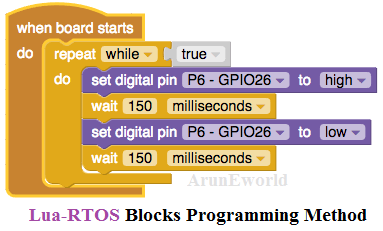
Note: Using Lua or block method is not important, Because both way programmings are the same programming environment.
Flashing Method
- go to your esptool folder and execute command \scripts\esptool.py –port com7 –chip auto write_flash 0x1000 bootloader.bin 0x10000 NodeMCU.bin 0x8000 partitions_singleapp.bin
- Open the flash tool for ESP32 and set follow parameters
Baud 921600.

flash_mod “dio”

flash_Freq “40m”

For Flash Fimware

Bootloader.WHITECAT-ESP32-N1.bin – 0x1000.

lua_rtos.WHITECAT-ESP32-N1.bin – 0x10000.

partitions_singleapp.WHITECAT-ESP32-N1.bin – 0x8000.

For Flash File System

spiff_image.WHITECAT-ESP32-N1.Bin
- go to your esptool folder and execute command C:\Users\ArunEworld\AppData\Local\Programs\Python\Python36-32>Scripts\esptool.py –port com3 –chip auto write_flash 0x1000 bootloader.bin 0x10000 NodeMCU.bin 0x8000 partitions_singleapp.bin
- The resulting log is below
esptool.py v2.0.1

Connecting........_

Detecting chip type... ESP32

Chip is ESP32D0WDQ6 (revision 0)

Uploading stub...

Running stub...

Stub running...

Configuring flash size...

Auto-detected Flash size: 4MB

Flash params set to 0x0220

Compressed 15824 bytes to 9223...

Wrote 15824 bytes (9223 compressed) at 0x00001000 in 0.8 seconds (effective 151.8 kbit/s)...

Hash of data verified.

Compressed 718400 bytes to 402934...

Wrote 718400 bytes (402934 compressed) at 0x00010000 in 36.2 seconds (effective 158.8 kbit/s)...

Hash of data verified.

Compressed 3072 bytes to 82...

Wrote 3072 bytes (82 compressed) at 0x00008000 in 0.0 seconds (effective 910.2 kbit/s)...

Hash of data verified.


Leaving...

Hard resetting...
Whitescat IDE Trouble Shoot
Error: Can’t Connect to Agent :
Solution. Install Agent.
For Windows :
- Click Start.
- Search for The Whitecat Create Agent application.
- If the application is present, click the Whitecat icon to launch the agent.
- If the application is not present, the agent is not installed.
If the agent is not installed follow this instruction to install it.
- Download the installer: http://downloads.whitecatboard.org/agent/createagent-windows.exe
- Run the installer (For now, the installer is not signed so you will receive this warning:) Click More info, and then Run anyway, to continue with the installation.
- Allow the installer to make changes to your computer (The installer needs to install some files in the system area, such as the scripts for launching the agent at boot time. Click Yes to continue.)
- Next, next, and Finish
- The White Create Agent is running now ( Once installed, The Whitecat Create Agent is running. In the system try, the Whitecat’s icon appears, indicating that the agent is running:)
- Open The Whitecat IDE and start to create ESP32 applications for Lua RTOS devices in an easy way. https://ide.whitecatboard.org
for Mac OS :
- Open finder.
- Search for The Whitecat Create Agent Folder.
- If a folder exists, open it.
- Click The Whitecat Create Agent icon to launch the agent.
- If the folder doesn’t exist, the agent is not installed.
for Ubuntu:
- Check if the Whitecat’s icon is on your desktop, and click to launch the agent.
- If the icon is not present click Search and enter The Whitecat Create Agent, if found click the Whitecat’s icon to launch the agent.
- If not found, then consider the agent is not installed.
Hello World – Get Start
- The below example prints the “Hello ArunEworld, Lua RTOS on ESP32!” string using a timer to call the function every 5 seconds.
-- Simple Lua RTOS example for ESP32

-- Define a function to be executed
function myFunction()
    print("Hello ArunEworld, Lua RTOS on ESP32!")
end

-- Set up a timer to call the function every 5 seconds
tmr.create():alarm(5000, tmr.ALARM_AUTO, myFunction)

-- Enter the Lua RTOS event loop
-- This will keep the script running and executing the timer function
-- You can add additional logic or tasks here as needed
os.run()
NEXT
| ESP32 Lua-RTOS IDE Setup |
| |
| ESP32 Lua-RTOP Module PIO |
| ESP32 Lua-RTOS Basic Ex |
| |
| ESP32 Lua RTOS Sitemap |
| ESP32 Lua-RTOS All Post |
You must be logged in to post a comment.